Part 3: Sink or swim in a crumble (on photographing food in a small kitchen with frozen shoulders and busy kids around).

If you mention a crumble to a Polish person, they would most likely very instinctively say that in Poland we have something quite similar but it is called ‘drożdżówka’ and it is actually a yeast-based cake that we often make with plumbs (or other fruit) when summer fades away and autumn takes charge of the table.

‘Drożdżówka’ has been always the treat that came out of my aunty’s oven every Sunday after the eleven o’clock mass that our priest always struggled to conclude. Hands were getting colder, legs were getting restless and as our stomachs were rapidly shrinking in size, our souls were working out their patience. Nourished with the Word of God, we either ran to our car or rushed to the pavements in hope for a piece of cake and a warming cup of hot coffee at my aunty’s place. ‘Niech Będzie Pochwalony Jezus Chrystus’ (May Lord Jesus Christ be Praised) was what used to be boldly exclaimed entering her kitchen. ‘Na wieki wieków, Amen’ (Now and ever shall be) was the reply. Interestingly, I observe, these words are slowly exiting our Polish culture as I hear us often saying ‘I’m back’ instead of the customary Christian greeting. I like the Christian greeting and it seems to me that our Sunday ritual is not entirely completed without those words. Ethnographers tend to notice these shifts in language patterns quite quickly just as they would note changes in how cakes are made. ‘Drożdżowka’ has changed and evolved in those Polish houses everywhere where the dietary requirements kicked in or other preferences are taking over, like losing weight, for instance.

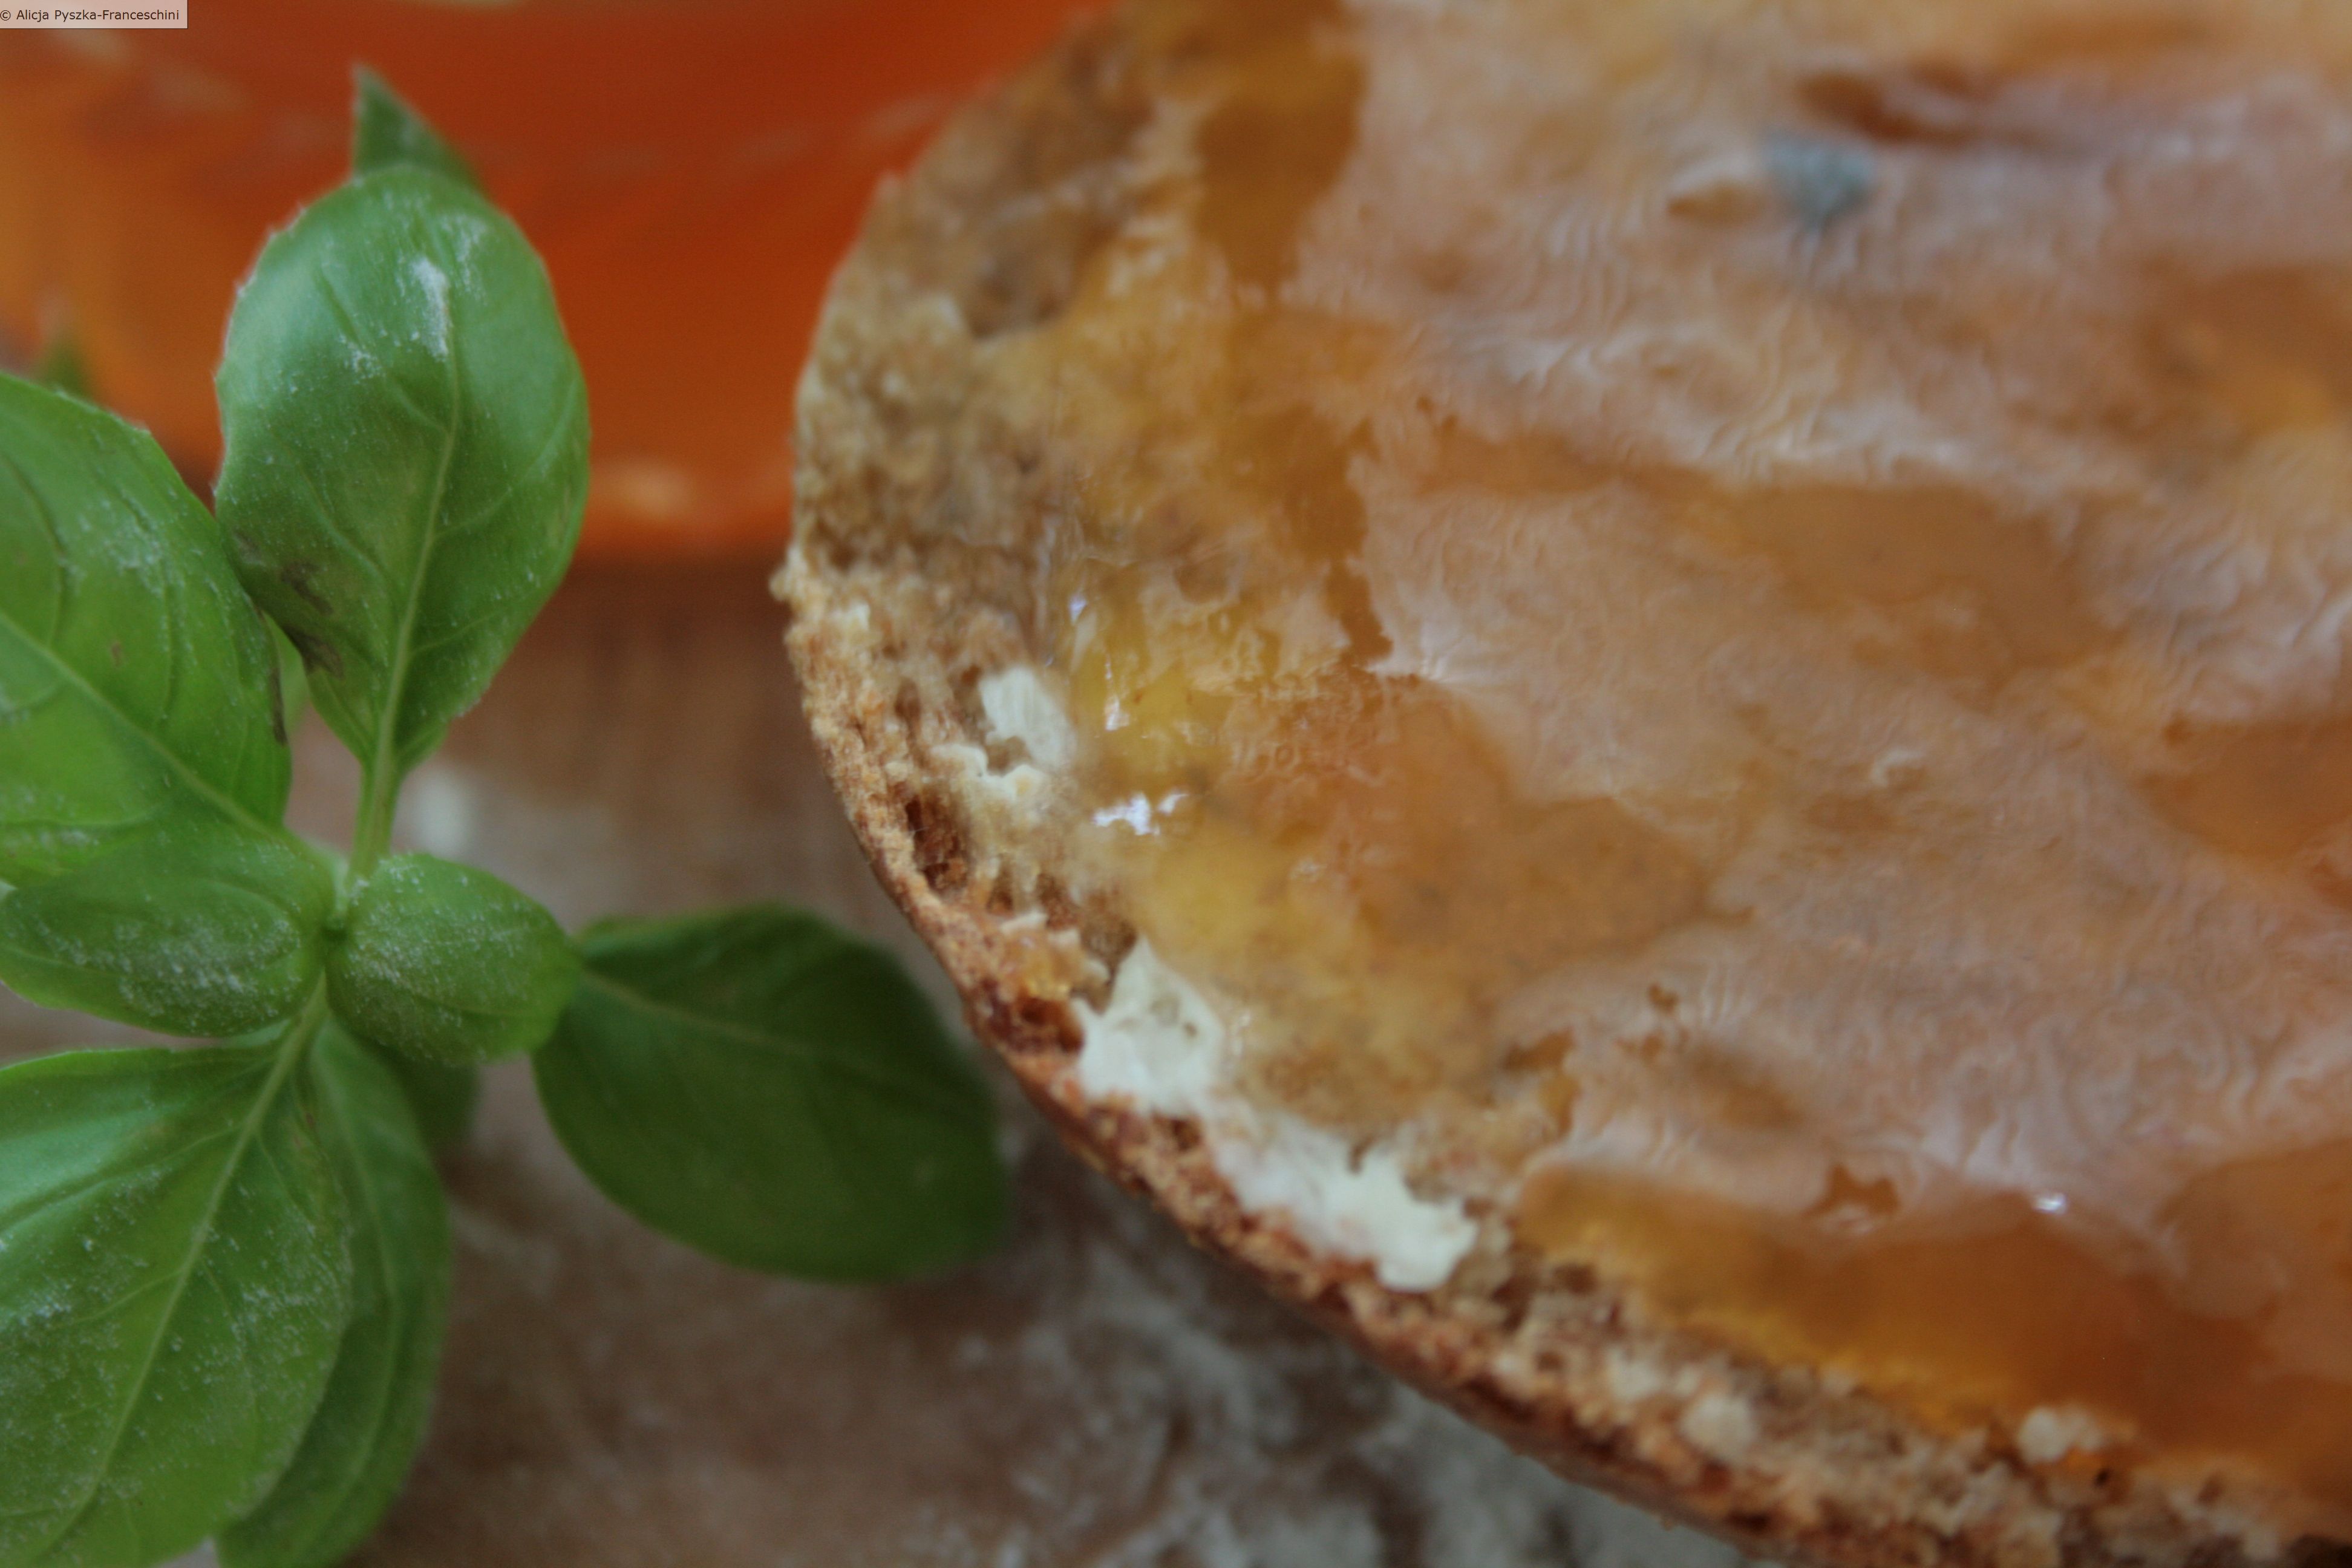
The English crumble, I feel, is what is replacing this cake in families such as ours where gluten and egg whites, cow’s milk are off the menu and yeast should be avoided. Now, of course, there are hundred of ways in which crumble can be made and eaten. The one that I photographed here was made with apples and pears, honey (from my dad’s beehives), cinnamon, gluten free flour, coconut flour and coconut oil. I must admit I feel a bit like Willy Wonka by showing you photos of a dessert for a second-week in a row and I worry that the police will come and fetch me for introducing sweets to the city, but I am sure that you understand it very well that it is all done in the good faith of preserving childhood dreams and mother’s sanity as photographing it and writing it all up in a small kitchen with two frozen shoulders is not a small effort. ;)

So last week I had these questions in mind/ obstacles while photographing:

– how to photograph the food when the kids want to eat it straight away

– how to photograph left overs or food partially eaten in a manner that is acceptable to the eye but at the same to preserve the sense of realism

– how to make use of the sink

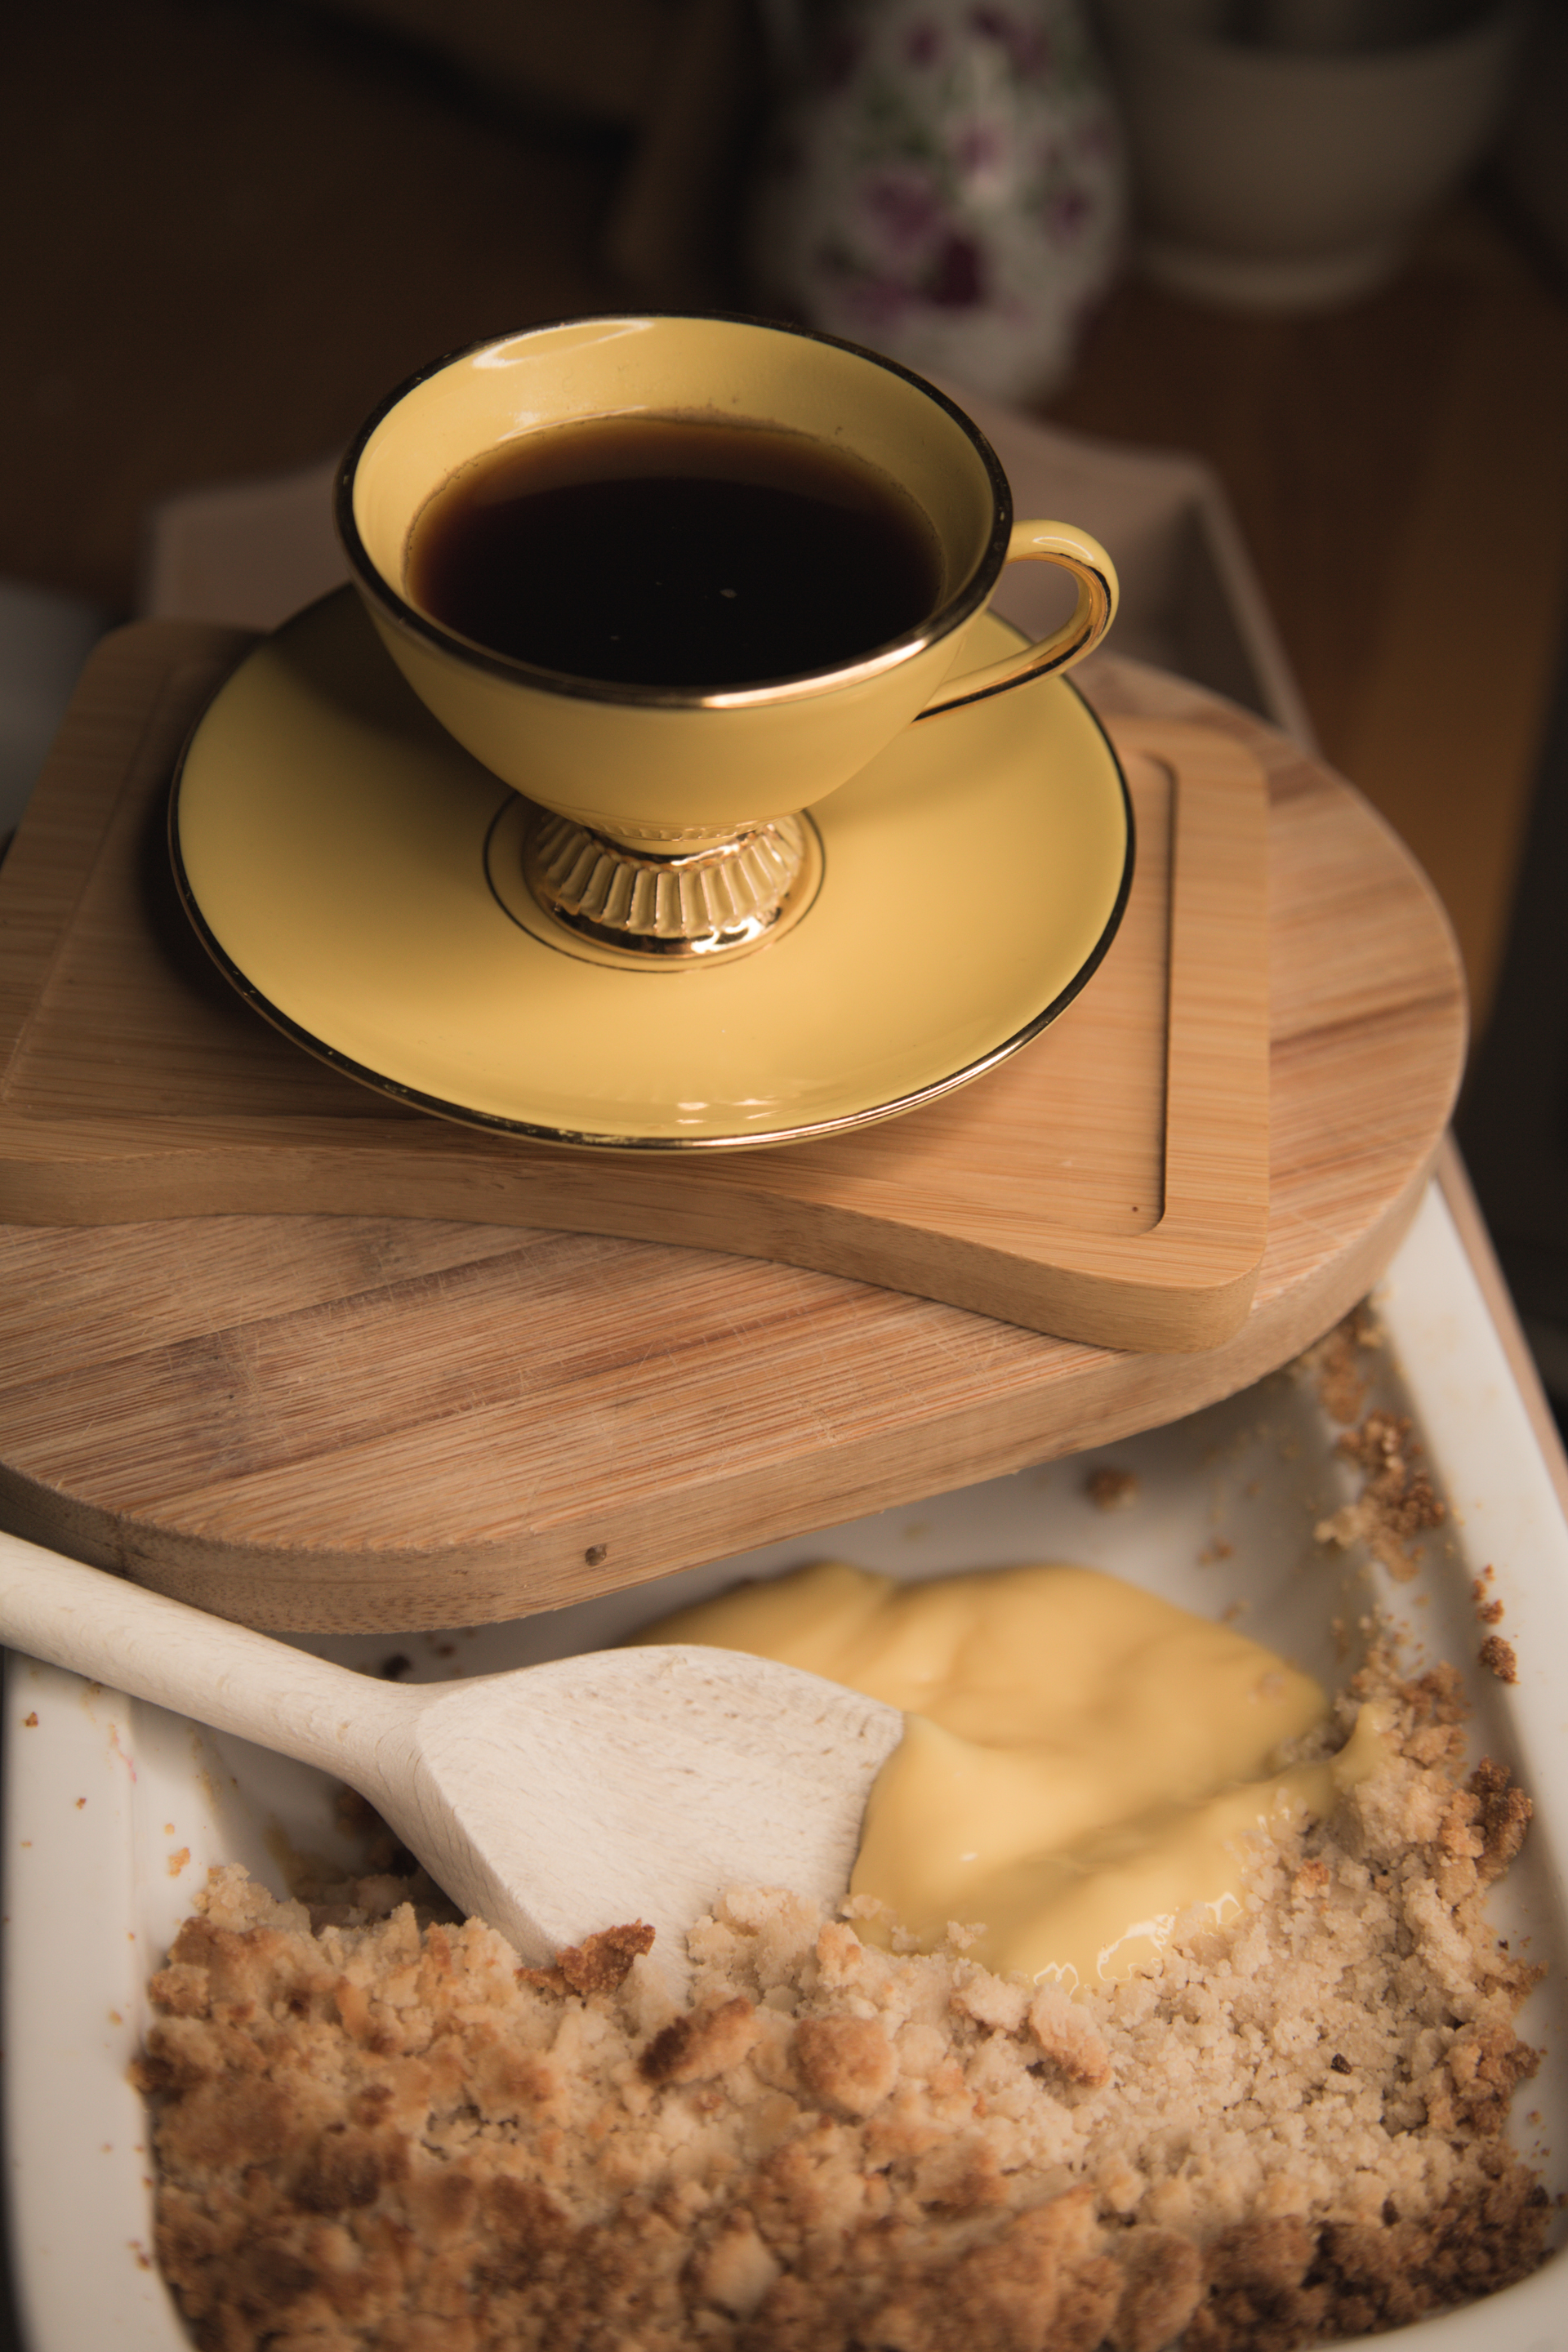
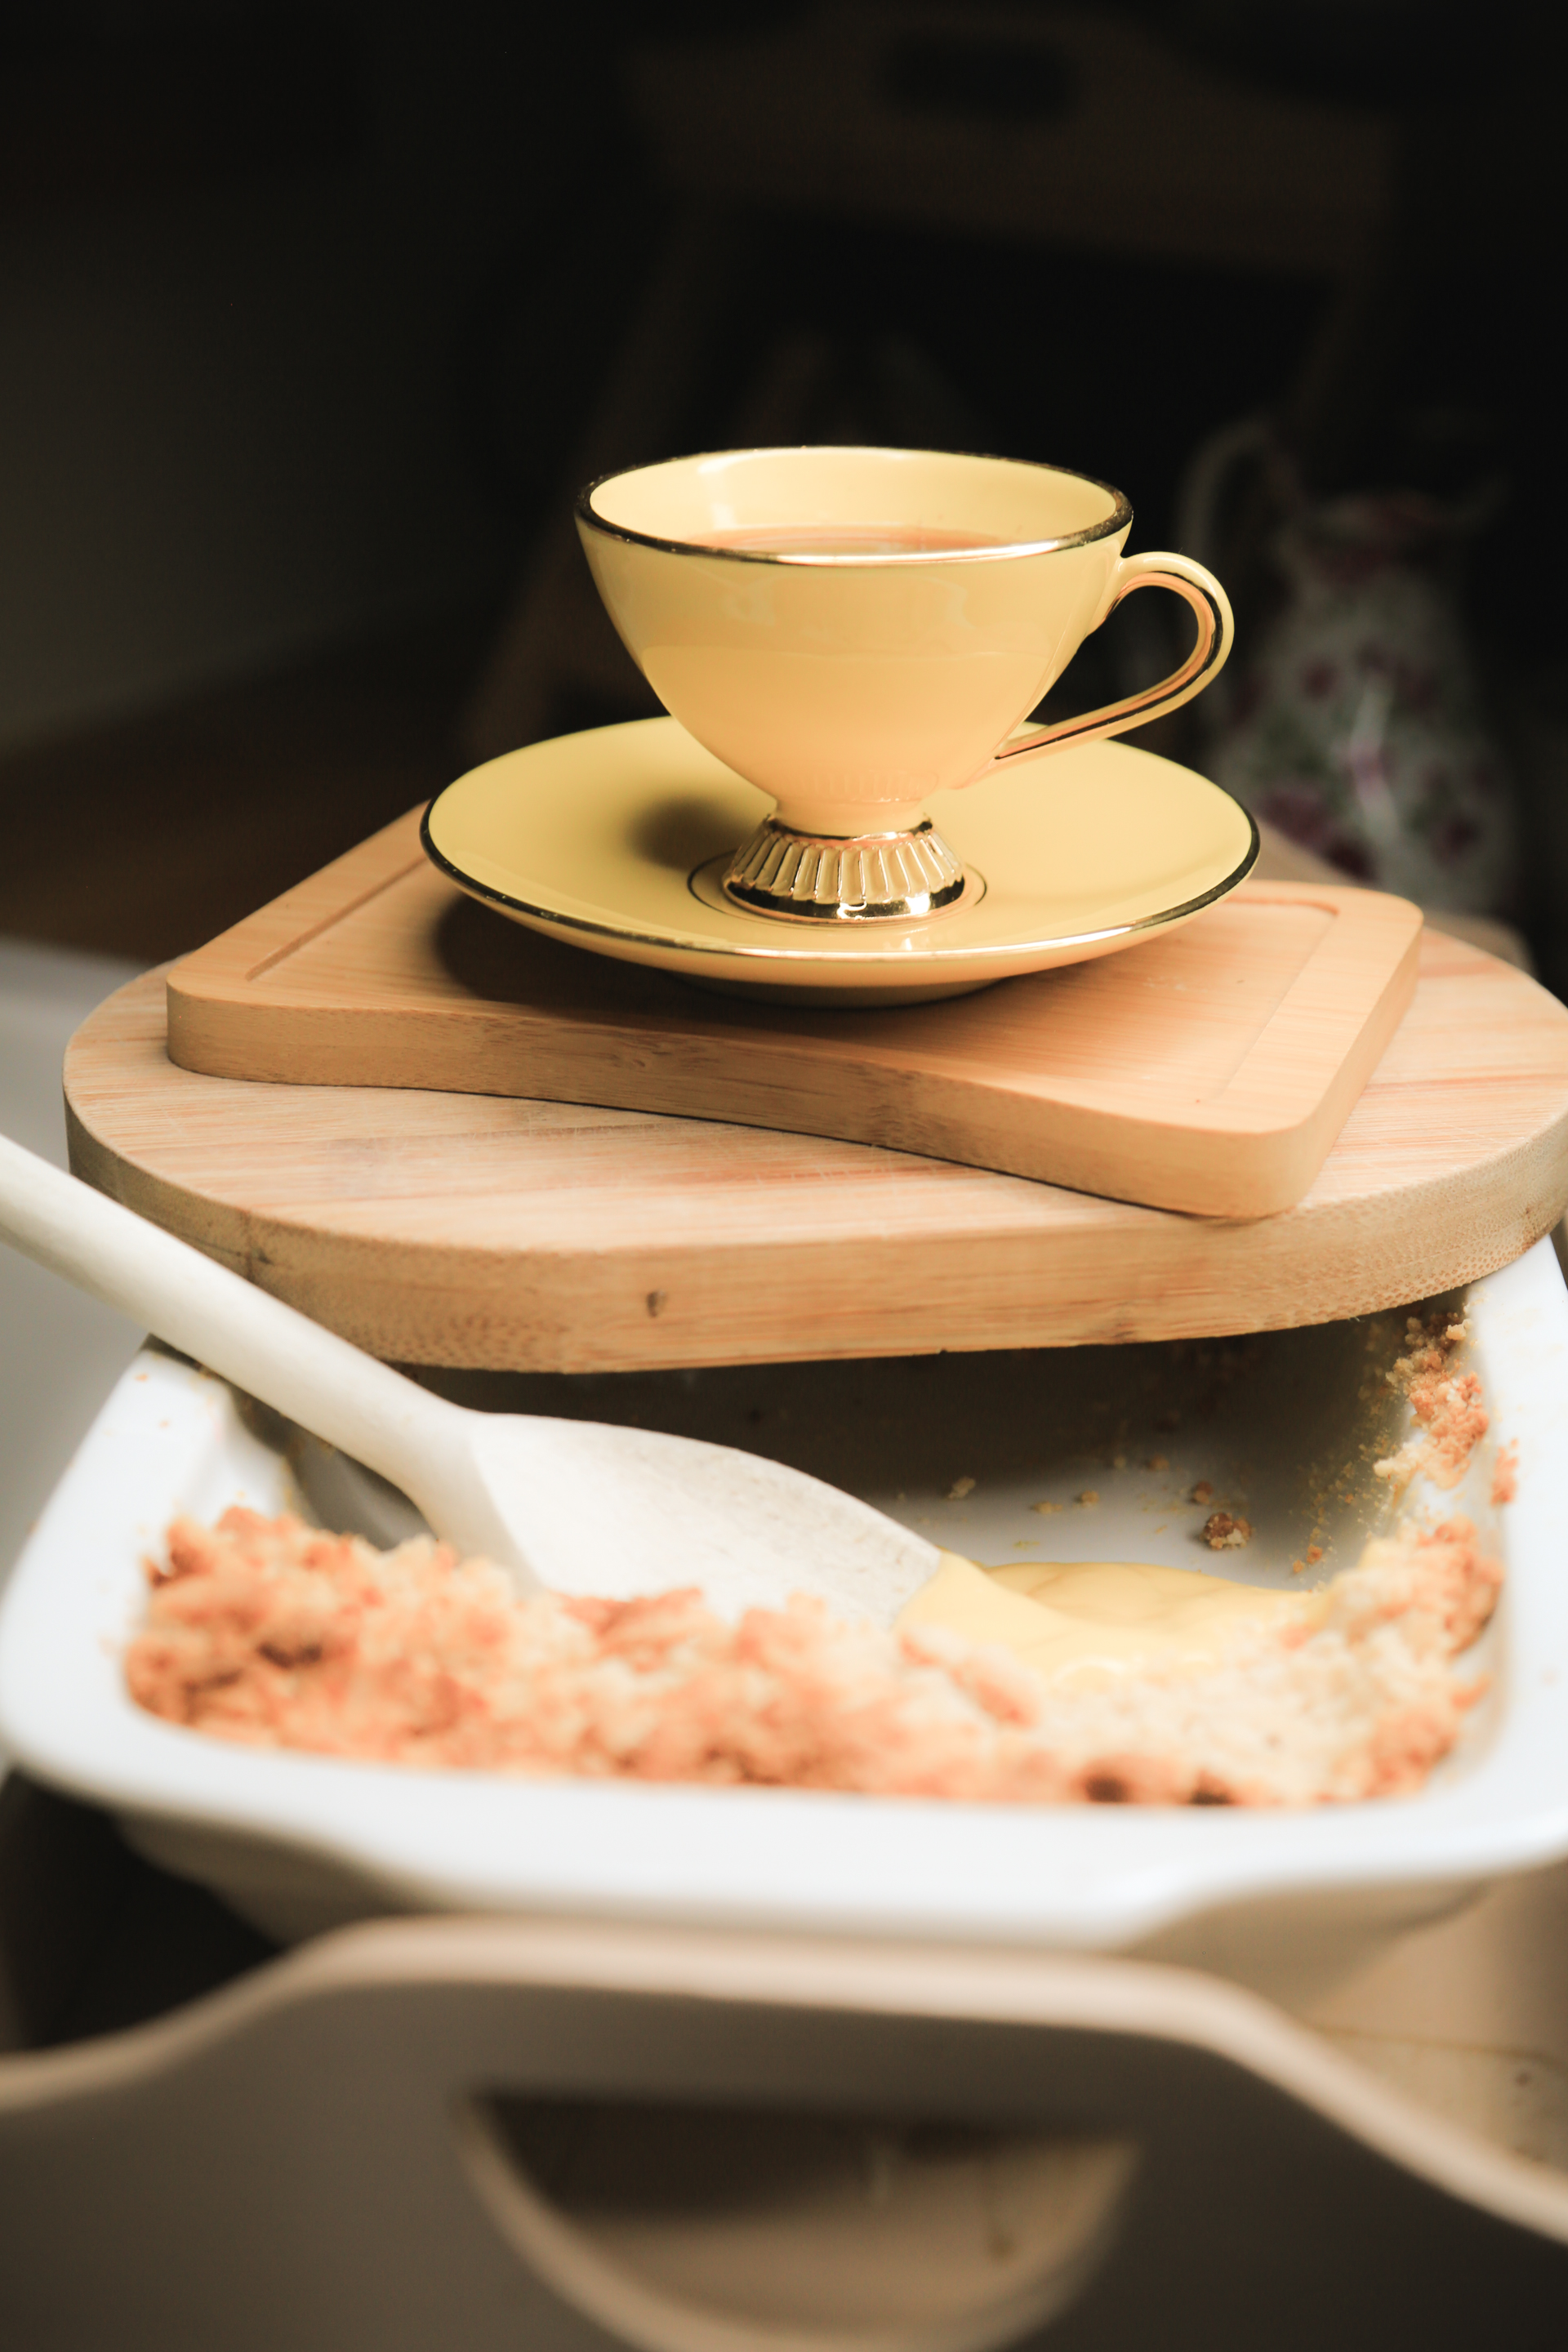
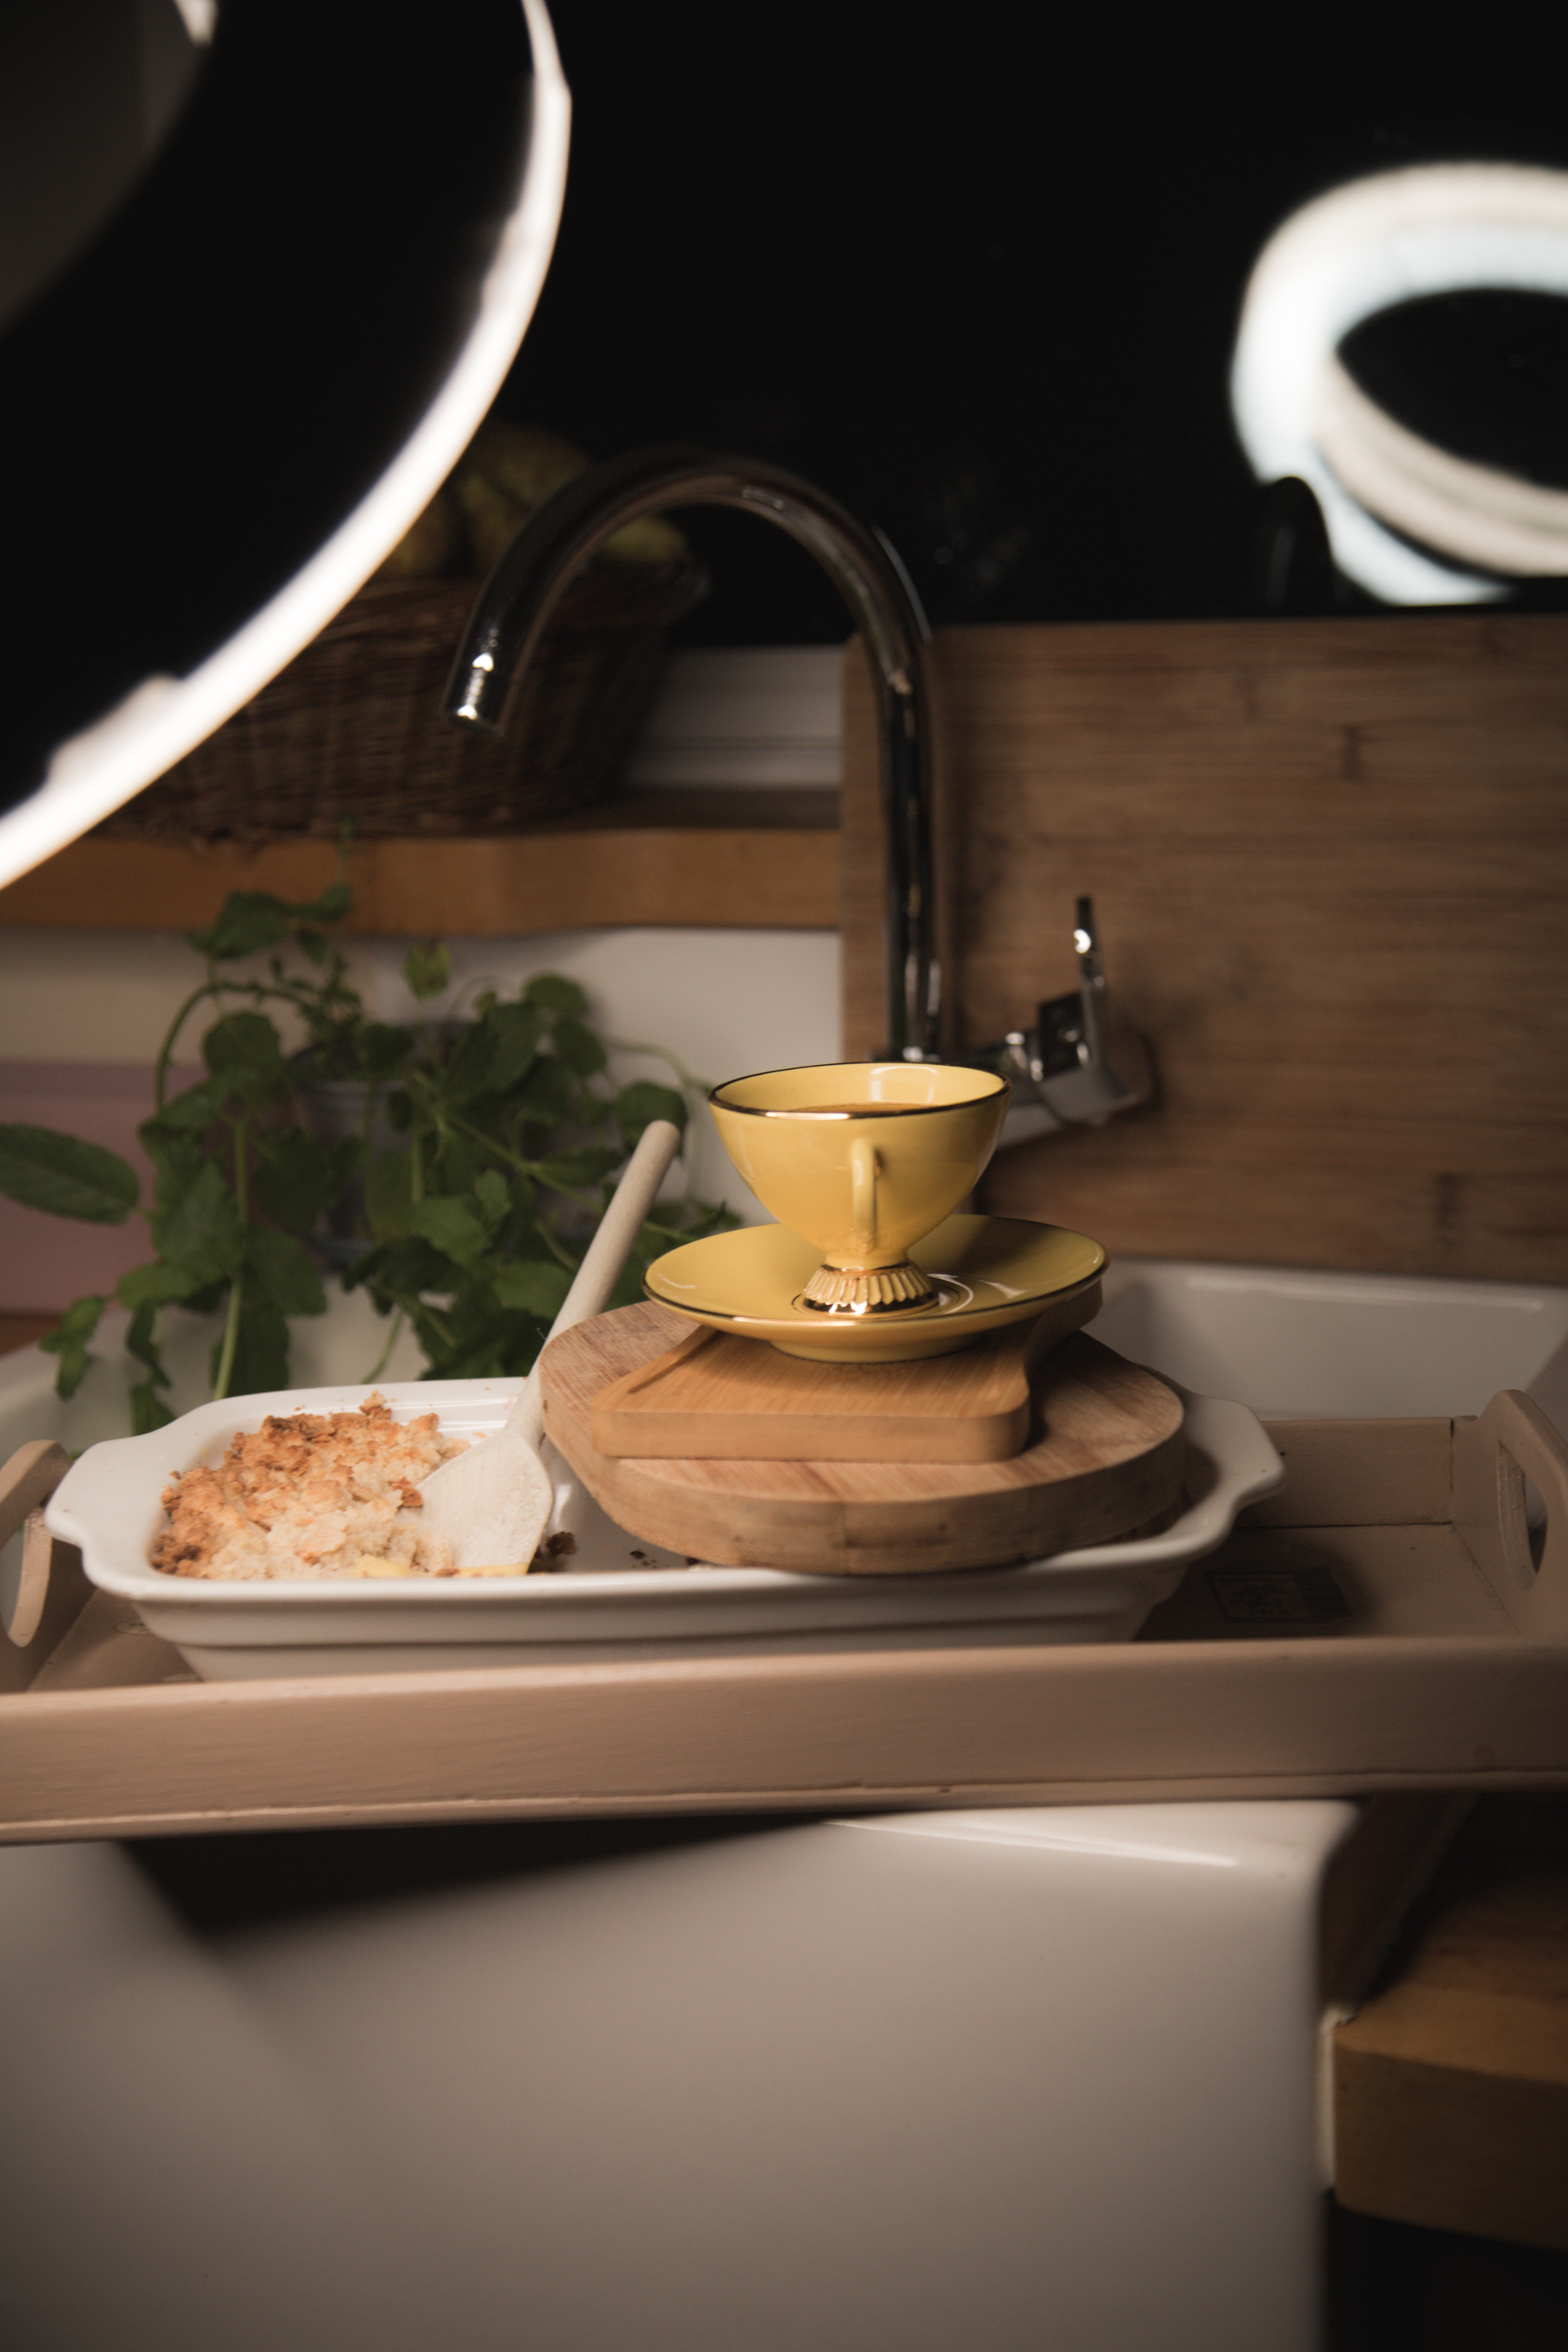
Essentially, I had this problem that we ate too much of it and too quickly but in all honesty waiting is difficult with hungry kids and all that you can do is to ask them to leave at least some for later or spoon some out before serving to preserve it for the photo (which comes in handy even a day after when you come back home from a cold walk and crave for some warming food). The crumble was lovely, but it resembled more of a pie than a crumble, I guess, because there was quite a lot of the dough. The dish was fairly flat, made of porcelain, rectangular and white. The very first thing that I thought of was that there would need to be a separation between the white colour of the dish and the white of the sink for a clearer composition so I decided to put it on a decoupaged beige tray that a differnt aunt of mine gave me a few years ago. I placed the dish with the tray in the sink for some photos to see what the effect would be with the white frame around the decoupaged try but in the end I like the one that sat higher on the edge of the sink as it gave me more depth to the background. The bits stuck to the side of the crumble pie dish were visible and quite unsightly so I decided to colour match the custard with a small towel and I placed it on the right side of the dish to cover the crumbs. That was done for the close-up. For a broader view, I looked for an additional item in the kitchen that again would somewhat decorate the food and take attention away from the fact that it was gluttonously devoured. I had this elegant chipped little coffee cup that I thought would take the attention and I placed it on a few wooden trays to give it prominence and posture. To complete the picture I used Contrastly autumn calm filters to give it it a calming and relaxing mood and feel – I wanted to evoke a feeling of calm after storm, one that you experience once the children are asleep and guests have gone home, and you are just on your own cleaning the kitchen. I included here also a backstage photo with my ring light for you to see how I positioned the light. I was taking the photos while standing on the left, just behind the ring light. On the backstage photo, the cup’s hand is directed at you. This is a compositional mistake. I remember a long time ago, I attended a course on children photography with Elena Shumilova and I couldn’t understand why one of the photos that I took of my daughter was compositionally worse than other ones. In that photo my daughter was sitting sideways and her elbow was somewhat lifted. Elena explained to me that it looked as if she was elbowing the viewer’s eye and in a way this is exactly what this cup appears to do in this backstage photo. It looks as if it was trying to elbow you so it is not the desired and the intended composition for a pleasing shot. Just the backstage photo. :)

Back to the topic of crumbles, last Sunday we visited Bradgate Park in Leicestershire and we stopped at the Coach&Horses for Sunday meal before the walk. Their crumble was a much healthier version to ours, I feel, as it had I think almost a triple the amount of fruit and it had less flour. As a result, theirs was a less fatty option to choose from. Avoid ours. But give photography at least an afterthought… :)

What have you been making recently?

Till now.

Alicja

P.S. I found heat patches to be very useful in easing my pain in the shoulders while I lift the camera up and while I hold it. I am using these ones at moment: Deep Relief Heat Patches. They might be useful to you too.

Is food photography possible in a small kitchen with small kids and frozen shoulders (mentoring post)?

I know that there is a handful of people here who like when I talk photography so I thought I will share with you how I resolved the problem of set ups and children in a small kitchen. I wish it occurred to me earlier but if it wasn’t for the frozen shoulders and my obtuse refusal to give up on taking photos, I would have not come up with it. If you have ever suffered from this condition, you know the pain and you know the catastrophising whisperer who is attached to it, i.e ‘I would never be able to do landscape photography. There is no way I can lift up my gear’ or ‘I would never be able to lift my elbows above my chest and get a decent photo.’ Well, it so happens that we do not always need to lift the camera above our chest to take a decent photo and we do not need kitchen surfaces to take them either.

It is ironic to some extent that it took me two frozen shoulders to see that I was quite limited in my thinking about food photography and my ability to do it in our circumstances. Limiting beliefs are good to discover for oneself simply to stay clear of too. This is what I used to think:

I thought that my kitchen was too small to take the photos of what we cook.

Obviously, I was mistaken.

I used to think that I need to make the surfaces empty to photograph the food we cook.

I was in the wrong about that.

I used to think that I would not be able to protect my set ups from my children’s hands.

I laboured with a false belief.

I used to think that having two frozen shoulders would mean I would not be able to handle my heavy camera.

I placed more trust in myself and my slow recovery.

I used to think that I must use the available daylight when I cook to have decent food photographs.

Where has this conviction originated?

To make your dream come true of taking photos of the food that you cook while you handle the kids and perhaps the partner that loves his cooking too, empty one drawer in your kitchen. If your situation is similar to mine, health-wise, use the lowest drawer available so that you can point the camera downwards. Create a set up in there. Choose your surfaces, clothes, trays, etc. Keep it all there and when the food is ready, plate it and rearrange it in your drawer to suit your taste. Take a photo.

I have chosen the lowest drawer in a shaded area in my kitchen where not much light gets in. I wanted to use a ring light to have full control over the brightness and the direction of light. I was bending the ring sideways to create artificial shadows for some photos. For brighter compositions I photographed directly from the top just through the ring light. Sometimes I squatted too and took photos from the side while the light was above the food.

In order to hold food in one place I use a wreath ring and I cover the wreath with a cloth. It is also useful for holding soup bowls or other dishes.

Happy with the results.

One step further to creative living with what we’ve got.

Poppy-seed Cake Recipe

Ingredients:

3 eggs

150g butter (chop it into small cubes)

1/2 cup of caster sugar

1/4 cup of milk

300g plain white cake flour

3/4 cup of poppy-seeds

1.5 tsp bicarbonate of soda (if you are using self-raising flour, this is not needed)

3 tsps cream of tartar (if you are using self-raising flour, this is not needed)

1 to 2 tsps of icing

Preparation

1. Separate the white of egg from the yolks. Put the white of egg to the fridge (it is easier to whisk when cold)

2. Combine the egg yolks with the sugar and the butter until the butter appears melted and you have a good and fairly runny consistency. (If your butter is too hard, you can add a little bit of warm water to make it melt and mix quicker)

3. Add flour, milk and poppy seeds, cream of tartar and bicarbonate of soda. Mix everything thoroughly. Start warming up the oven – set it to 175°C.

4. When the oven is heating up, take the white of egg out of the fridge and in a separate bowl whisk the egg yolks into a firm foam. Pour the foam into the cake mixture and gently fold it into the cake mix. Do it until the whole mixture is well combined and little bubbles appear in it. (At this stage you can also add some flour if you think that you cake is too runny).

5. Butter your cake tin (or fill it up with greaseproof paper), pour in the cake mix and put it to the heated oven for about 55-65 minutes. If you put a knife into your cake and the blade comes clean that means the cake is ready. If your mixture was quite wet or you have used a different cake tin, it might take a bit longer to bake.

6. When the cake cools, you can decorate it with some icing powder. I use my small tea leaf holder for this purpose. It helps me to sprinkle the powder evenly on the cake:)

Share and Enjoy!

Food making:)

What’s inside our bread?

Baked Bread

Wanted. Loved. Devoured daily. But messed with on a big scale too. Only a few decades ago in the UK its “particularly interesting” example was so white that it appeared almost luminous. People marveled over its brighter than chalk tint. The astonishing hue was mesmerizing and very few questioned its look. This was a mistake. Chlorine dioxide gas was nothing but a type of bleach used in the UK’s bread till 1999 when the government decided to put a ban on it (Whitley, 2006).

There is no chlorine dioxide in the UK’s bread today but there are still many bleaching agents, additives, preservatives and enzymes that aim to artificially enhance the taste and the look of bread, decrease its mixing and baking time and superficially boost the volume of the bread. In his book Bread Matters, Andrew Whitley gives a very long list of various enzymes (and their effects) that are used in making bread dough: Maltogenic amalyse, Peptidase, Amylase, Xylanase and many more (the names in themselves sound terrifying, don’t they?). Most breads also contain emulsifiers. Their job is to prevent the loaf from going stale too quickly. These and other supplements compromise the nutritional value of many loaves that we eat. No wonder therefore that there are more and more people who are deciding to go back to basics and who are learning to knead the bread again within the corners of their kitchens and who are finding enormous joy in doing so. Maybe it’s because they are creative with making different bread shapes (buns, rolls, loaves and flat breads), with using different flour compositions (wholemeal, white, rye, spelt, malted wheat flakes) and with putting their favourite ‘stuffing’ (sunflower seeds, sun-dried tomatoes, dates, pumpkin seeds, olives) into their breads. We do that too and I must say there is something very satisfying about baking your own bread… perhaps it is its comforting smell or the appealing symbolism that bread-making conveys… that of motherhood and that of life, strength and resilience. (More Images and Recipe Below)

Bread Recipe:

Ingredients:

250g Strong White Flour

250g Strong Wholemeal Flour

100g Malthouse Flour also known as Granary or malted wheat grain (it’s optional, but greatly enriches the flavour)

400-500ml Water

1 Teaspoon of Dried Yeast

1 to 2 Teaspoon of Salt

25-50ml Olive Oil

Into a small bowl of lukewarm water put the yeast with 2 spoons of flour. Put it aside for half an hour and let the yeast feed off the flour. When you see small bubbles forming on the surface of the water it means that the yeast mixture is ready. Now, in a large bowl mix all the flours with the salt and slowly stir them adding the water. It’s ok if it feels quite sticky at this point. Knead the dough for at least 10 minutes until it feels fairly soft and elastic  [you can add extra flour or water to ease the process]. Slowly pour the olive oil and again knead it into the bread mix. Form a nice rounded loaf and cover it with a wet tea towel and leave it overnight for the dough to rise. A day after, cover a flat baking tray with grease proof paper and form small (4-5 cm) buns. Add dates, sunflower seeds or nuts to the mixture if you wish. Bake in 180-200°C for around 30-40 minutes. There is no need to preheat the oven. It’s good to allow the buns to grow with the increasing heat. It’s delicious served with butter and mirabelle jam (or stuffed with dates) especially if you are only baking with wholemeal and white flours. The wholemeal can be quite bitter and the sweetness of mirabelle plums or dates just complement those flours so well. Enjoy! Bon appetite!

Ingredients

water

Salt Flour  yeast mixture Bread doughCoveredBread _Postcard Last but 1Bread PostcardBread wit mirabell jam

Based on:  Andrew Whitley (2006) Bread Matters. Fourth Estate: London.